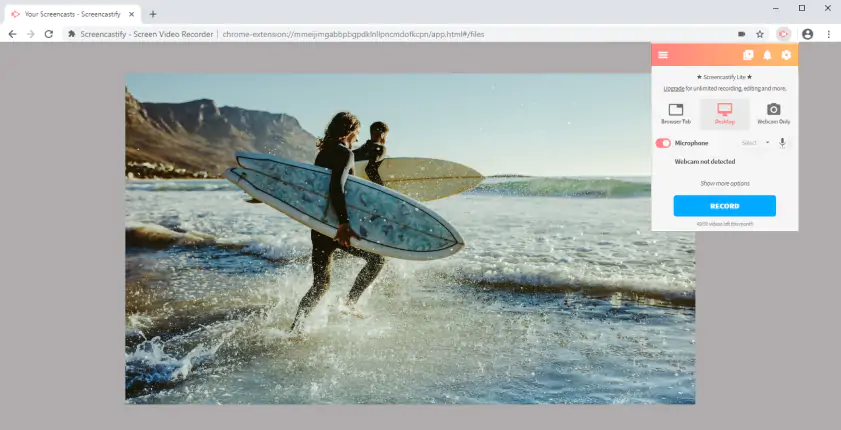
How to Record Videos on a PC – Top Desktop & Online Tools

Edited by
Ben Jacklin
5,991

Key takeaways

  • When I needed to learn how to record videos on PC properly, I ended up testing a surprisingly wide spectrum of tools, from full-scale production environments like OBS Studio and Riverside.fm to quick, almost disposable solutions like Loom and Screencapture.com. What became clear is that these tools aren’t competing on the same field. Some are built for control and quality, others for speed and communication, and trying to compare them directly feels slightly misleading.
  • The pros and cons follow a predictable pattern, but they still shape the experience in very real ways. More advanced tools tend to offer flexibility (multi-source recording, audio control, editing) but demand time and patience in return. Simpler options like Xbox Game Bar or Windows Camera trade that depth for immediacy, letting you record without thinking too much. Free versions often introduce quiet compromises, from watermarks to feature limits, which only become obvious after extended use.
  • Choosing the right software, at least in my experience, comes down to intent rather than features. When I needed precision or a layered setup, I naturally gravitated toward OBS or ScreenPal. When the goal was simply to explain something quickly, tools like Loom or Screencastify felt more appropriate. It’s less about what the program can do, and more about how much effort you’re willing to invest for a given result.
  • One practical lesson stood out almost immediately: audio quality can make or break a recording. Even with the best visual output, poor sound turns the whole thing into something difficult to watch. I found that taking a moment to check microphone levels and deal with background noise improved results across every app I tested. It’s a small step, but it changes how the final video feels.

I didn’t plan to spend several evenings talking to my own screen trying to figure out how to capture a video on PC, but that’s exactly what happened once I started testing video recorders for PC, and somewhere between my tenth “just one more test clip” and a growing folder of awkward recordings, I realised how wildly different these tools actually are. Some felt like full studios, complex and slightly intimidating, while others behaved more like a quick voice note, only with pixels, which made the whole experience oddly uneven but also more interesting than I expected. I put all of them through their paces, from OBS Studio to Riverside.fm, testing how they handle real-world tasks like tutorials, quick demos, and the occasional “why isn’t this working” moment that inevitably shows up.

What surprised me most wasn’t just the feature gap, but how differently each tool approaches the same idea of recording your screen, with some clearly built for production and others focused entirely on speed and communication. After trying them all, yes, all of them, I narrowed things down into a practical list of standout apps that are actually worth your time depending on what you need. This isn’t a lab test or a sterile comparison, it’s closer to field notes from someone who pressed record far too many times and learned that the best tool isn’t always the most powerful, it’s the one you’ll actually use.

Comparison table: Best programs to capture videos on a PC

Program

OS

Main advantages

Download

Windows, macOS, Linux

Free and open-source, highly customizable, supports multi-source recording and streaming

Windows, macOS

Easy to use, built-in annotations, supports screen and webcam recording

Windows, macOS

User-friendly interface, quick setup, basic editing tools included

Top programs to capture videos

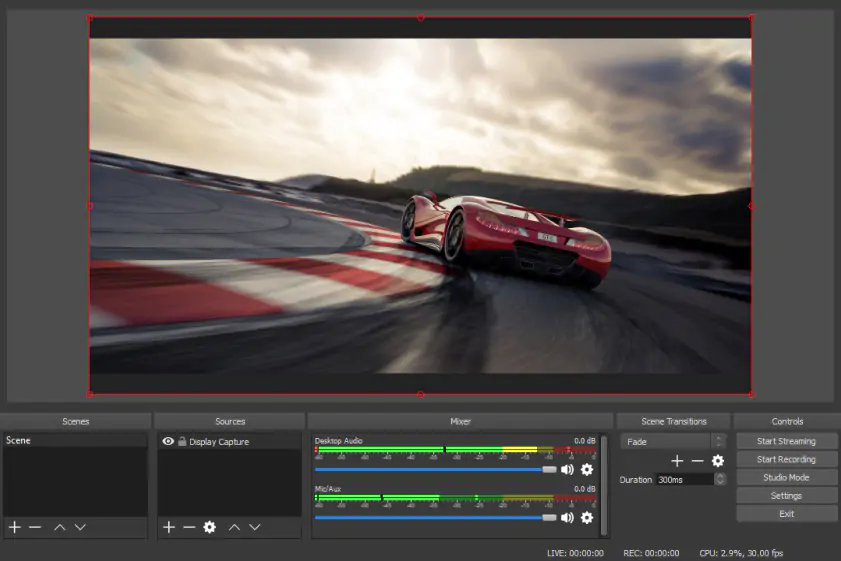
Why I picked it: OBS Studio gives me near-total control over every element of recording, from multiple sources to audio mixing. I liked how, once I got past the learning curve, it felt less like software and more like running my own mini production studio.

When I first opened OBS Studio, I had the distinct feeling that I’d stepped into something built for professionals rather than casual users. The interface is dense, almost intimidating, with panels for scenes, sources, audio mixers, and transitions all competing for attention. It took me a solid half hour just to understand how to properly set up a basic recording with screen capture and microphone input. But once I got past that initial barrier, the software began to reveal its real strength – control. I could layer multiple sources, switch between scenes, and fine-tune audio levels with precision that most tools simply don’t offer. Recording gameplay, tutorials, and even webcam overlays felt seamless once everything was configured correctly.

What impressed me most was how scalable OBS feels. On one hand, you can use it for a simple screen recording; on the other, you can build something that resembles a live production studio. I experimented with adding transitions and overlays, and suddenly my recordings looked far more polished than I expected. There are no watermarks or time limits, which makes it particularly appealing for long-form content. However, this level of freedom comes at the cost of simplicity: it’s not something I’d recommend if you need a quick, no-friction recording. OBS demands time and patience, but in return, it gives you near-total creative control.

Ratings

Cons:
  • Steep learning curve for beginners

  • No built-in video editor and can require manual setup

Why I picked it: AceThinker Aqua Demo makes recording feel guided and approachable, which I appreciated after dealing with more complex tools. I liked its built-in annotations, letting me create tutorial-style videos without extra editing.

Using AceThinker Aqua Demo felt like a deliberate contrast to OBS. No attempts of figuring out just how to record a video on a computer – from the moment I launched it, the interface guided me toward action rather than configuration. Buttons are clearly labeled, and within seconds I was selecting a recording area and hitting record. I tested both full-screen capture and a smaller custom region, and switching between them was effortless. The software also integrates webcam recording smoothly, allowing me to overlay my face while demonstrating on-screen actions. For someone creating tutorials or presentations, this combination is incredibly useful.

Where Aqua Demo really stands out is in its annotation tools. During recording, I could add arrows, highlights, and text in real time, which made my test videos feel more like structured lessons. This eliminates the need for heavy post-production, something I appreciated after dealing with more complex tools. The export options are flexible, and the final video quality held up well even during longer recordings. It doesn’t try to overwhelm you with advanced production features, and that’s precisely its strength. Instead, it focuses on making the recording process smooth and intuitive, which makes it a practical choice for everyday use.

Ratings

4.9/5

Pros:
  • Easy-to-use interface with built-in annotations and editing tools

  • Supports screen + webcam recording with good output quality

Cons:

Why I picked it: Movavi Screen Recorder strikes a balance between simplicity and capability, which made it comfortable to use right away. I liked how quickly I could record, trim, and save clips without breaking my workflow.

I approached Movavi Screen Recorder with moderate expectations, but it quickly became one of the most comfortable tools for Windows and Mac that I tested. The interface is clean and minimal, with just enough options to feel capable without becoming confusing. Setting a capture area is as simple as dragging a frame across the screen, and I appreciated how responsive the controls felt. I tested recording a tutorial with both system audio and microphone input, and everything synced perfectly without requiring extra configuration. It’s the kind of experience that feels polished from the start.

What makes Movavi particularly appealing is how it balances recording and light editing. After capturing a clip, I could trim unnecessary sections immediately, saving time compared to exporting and editing elsewhere. The software also handles scheduled recordings, which is useful if you need to capture something at a specific time. While it doesn’t offer the deep customization of OBS, it doesn’t pretend to. Instead, it focuses on reliability and ease of use, which makes it ideal for users who want consistent results without a steep learning curve.

Ratings

Pros:
Cons:
  • Limited advanced features compared to OBS

  • Free version includes watermark

Why I picked it: Xbox Game Bar is already built into Windows, which means I could start recording instantly without installing anything. I liked its speed and reliability for quick captures, especially when I didn’t want to overthink the process.

I initially underestimated the Xbox Game Bar, assuming it was just a gaming accessory rather than a serious recording tool. However, its biggest advantage became clear almost instantly: accessibility. Pressing a simple keyboard shortcut brings up the overlay, and recording starts within seconds. I tested it with gameplay footage as well as a standard application demo, and it handled both scenarios surprisingly well. The performance impact was minimal, which is crucial when recording resource-intensive applications.

That said, its limitations are equally apparent. It struggles with full desktop recording and prefers to focus on individual applications, which can be restrictive. There’s also very little in the way of editing or customization: what you record is essentially what you get. But in some cases, that simplicity is exactly what makes it useful. If you need a quick recording without installing additional software, Xbox Game Bar is already there, waiting. It’s not a full-featured solution, but it’s a reliable fallback.

Ratings

3.5/5

3.5/5

Pros:
  • Built into Windows and easy to access instantly

  • Optimized for gameplay recording with low performance impact

Cons:

Why I picked it: Awesome Screenshot & Recorder works directly in the browser, making it perfect for fast, web-based recordings. I liked how easily I could capture and annotate content without leaving Chrome.

Testing Awesome Screenshot & Recorder felt like embracing a lighter, more agile approach to recording. Installed as a browser extension, it integrates directly into Chrome, which means there’s no heavy software to manage. I started by capturing a browser tab, and the process was almost instantaneous. It’s particularly effective for recording web-based workflows, making it ideal for tutorials, bug reports, or quick demonstrations. The simplicity of the interface ensures that you’re never more than a few clicks away from recording a webinar or a video from Youtube.

The annotation tools add another layer of usefulness. After recording, I could highlight sections, add notes, and draw attention to specific elements on the screen. However, once I tried to move beyond the browser environment, the limitations became clear. This isn’t designed for complex, system-wide recordings. Instead, it excels in its niche: quick, focused captures within the browser. For that purpose, it’s both efficient and reliable.

Ratings

Pros:
Cons:
  • Limited functionality outside browser recording

Why I picked it: FlashBack Express delivers solid recording quality without adding watermarks, which immediately stood out. I liked its reliability – it just works without demanding much attention.

With FlashBack Express, I found a tool that quietly delivers without much fanfare. The setup process is straightforward, and within minutes I was recording both screen and webcam simultaneously. The interface leans toward simplicity, but it doesn’t feel limited. I tested longer recordings to see how it handled performance, and it remained stable throughout. The absence of watermarks in its free version is a notable advantage, especially for users who want clean output without upgrading immediately.

The recording quality is solid, and the software includes basic editing features that allow for trimming and minor adjustments. While it doesn’t push boundaries in terms of innovation, it excels in consistency. This is the kind of tool you can rely on for regular use without worrying about unexpected issues. It may not attract attention, but it earns trust through dependable performance.

Ratings

4.6/5

Pros:
  • No watermarks or time limits in free version

  • Good recording quality with webcam support

  • Interface is clear and intuitive

Why I picked it: recordMyDesktop is lightweight and efficient, especially on systems where resources matter. I liked its no-frills approach, focusing purely on recording without unnecessary extras.

Using recordMyDesktop felt like stepping back into a more minimalist era of software design. It’s lightweight and straightforward, with an interface that prioritises function over form. I tested it on a Linux system, and it performed exactly as expected: capturing the screen without unnecessary overhead. There’s a certain efficiency in how it operates, using minimal system resources while still delivering acceptable video quality.

However, the lack of modern features is impossible to ignore. There’s no built-in editing, and configuration options are relatively basic compared to newer tools. Yet, for users who value simplicity and performance, this can actually be an advantage. It’s not trying to compete with full-featured suites; instead, it focuses on doing one job well. In that sense, it remains a relevant option, particularly for older systems or users who prefer open-source solutions.

Ratings

Pros:
  • Simple and easy to use

  • Open-source and free

Why I picked it: Windows Camera is instantly available and requires no setup, which makes it a convenient fallback. I liked how I could record webcam clips in seconds without installing anything.

I didn’t expect Windows Camera to play any meaningful role in a discussion about PC video recording, but it ended up being more useful than I anticipated. It’s primarily built for webcam capture, and that focus is immediately obvious when you open it. There’s no clutter, no overwhelming interface, just a clean window with a record button. I used it to capture a few short clips directly from my webcam, and the process felt almost instant. There’s something refreshing about software that doesn’t ask you to configure anything before you begin.

Of course, its limitations are just as clear. It doesn’t support screen recording at all, which makes it a secondary option in this context. Still, for quick webcam videos, it performs reliably and without fuss. The video quality is perfectly acceptable for casual use, and files are saved immediately without additional steps. I found myself using it when I needed something fast and disposable rather than polished. It’s not a complete solution, but it works as a convenient fallback. In a way, it feels like a built-in safety net rather than a primary tool.

Ratings

4.9/5

Pros:
  • Lightweight and efficient for low-resource systems

  • Quick webcam recording with no setup required

Cons:

Why I picked it: ScreenPal combines recording and editing in one place, which simplified my workflow. I liked how I could go from capture to a finished video without switching tools.

Testing ScreenPal felt like stepping into a platform that tries to cover the entire recording process from start to finish. It combines screen capture, editing, and even hosting into a single environment, which simplifies the workflow considerably. I recorded a short tutorial and moved straight into editing without switching applications, which saved time. The interface is intuitive, guiding you through each stage without overwhelming you with options. It’s clear that the tool is designed with usability in mind.

What impressed me most was the range of editing features available after recording. I could add captions, overlays, and simple transitions without needing external software. While it doesn’t reach the level of professional editors, it offers more than enough for most everyday projects. This makes it particularly appealing for educators and content creators who want an all-in-one solution. The balance between functionality and simplicity feels well judged. It’s not the most powerful tool I tested, but it’s one of the most convenient. Over time, that convenience becomes its biggest strength.

Ratings

Pros:
Cons:
  • Advanced features require paid version

  • Editing tools not as powerful as pro software

10. Ezvid

Why I picked it: Ezvid offers an all-in-one interface for recording and editing, which speeds up simple projects. I liked how quickly I could create a basic video without exporting a file.

Using Ezvid was an interesting experience, mainly because it feels like it belongs to an earlier generation of screen recording tools. The interface combines recording and editing in a single window, which initially seems efficient. I recorded a short clip and immediately began editing, adding text and narration without exporting anything. This integrated approach makes quick projects feel faster and more direct. It’s easy to see the appeal for users who want everything in one place.

However, the software shows its age in several areas. Performance can be inconsistent, especially during longer recordings or edits. The interface also lacks the polish and responsiveness of more modern alternatives. Despite these issues, it still manages to handle basic tasks without major problems. For simple recordings, it remains usable and reasonably effective. I wouldn’t rely on it for complex or professional work, but it hasn’t lost all relevance. In a limited role, it still gets the job done.

Ratings

Pros:
Cons:
  • Limited performance

  • Lacks advanced features and flexibility

11. Loom

Why I picked it: Loom turns recording into communication, letting me share videos instantly via links. I liked how fast and effortless it felt compared to traditional tools.

I found Loom to be one of the most immediately practical tools I tested, mainly because it removes almost all friction from the recording process. I could start capturing my screen and webcam within seconds, without dealing with complicated settings or setup. It feels less like traditional recording software and more like a communication shortcut, something designed for quick explanations rather than polished productions. During my tests, I used it to walk through websites and explain simple tasks, and it handled both smoothly. The interface stays out of the way, which makes it easy to focus on what you’re actually trying to say.

What really defines Loom is how quickly it moves from recording to sharing. As soon as I stopped recording, a link was generated automatically, ready to send without exporting anything. There are a few light editing tools, like trimming, but they’re clearly secondary to speed. The reliance on cloud storage might not suit everyone, especially offline, but it rarely felt like a barrier in practice. Over time, I noticed I was using it more out of habit than necessity, simply because it was faster than alternatives. It’s not built for high-end production, but for communication, it feels almost perfectly optimized.

Ratings

4.7/5

Pros:

Why I picked it: Screencastify runs in the browser and is incredibly easy to start using. I liked its focus on quick, interactive recordings, especially for tutorials.

Working with Screencastify felt refreshingly straightforward, especially because it operates entirely within the browser. I installed it as a Chrome extension and was recording within minutes, which immediately lowered the barrier to entry. I tested capturing browser tabs, full screens, and webcam overlays, and switching between these modes was simple and intuitive. The interface is clean and clearly designed for users who don’t want to spend time learning complex tools. It feels particularly suited to quick tutorials or educational content.

What stood out during my testing was its focus on interaction and clarity. I could add annotations, highlight cursor movements, and make recordings more engaging without extra software. This makes it especially useful for teaching or presenting ideas visually. The free version does come with noticeable limits, particularly in recording length, which I reached fairly quickly. Still, for short-form content, it performs reliably. It’s not trying to compete with professional software, but within its niche, it feels well-designed and efficient.

Ratings

Pros:
Cons:
  • Free version has time limits

  • Limited advanced features

Why I picked it: Screencapture.com requires no installation, which makes it ideal for quick, one-off recordings. I liked how I could start recording almost instantly from a browser.

Trying Screencapture.com felt almost like bypassing software altogether and going straight to the result. There’s no installation process, no setup screens, just a website where you grant permissions and start recording. I tested both screen and webcam capture, and the process was smooth from beginning to end. It’s clearly built for speed and convenience rather than flexibility. The simplicity makes it accessible even for users who have never recorded their screen before.

At the same time, that simplicity defines its limits. There are very few customization options, and editing features are minimal at best. You won’t be producing complex or highly polished videos here. But for quick, one-off recordings, it’s surprisingly effective. I found it particularly useful when I didn’t want to install anything or commit to a full tool. It’s not a long-term solution, but it fills a specific need very well.

Pros:
  • No installation required, runs in browser

  • Quick and simple recording process

Cons:
  • Limited customization and editing options

Why I picked it: BombBomb Video focuses on personal communication rather than polished production. I liked how it lets me send video messages that feel more human than text.

Using BombBomb Video felt like stepping slightly outside the traditional idea of screen recording. Instead of focusing on production, it centres on communication, particularly through email. I recorded short webcam clips and simple screen demos, then embedded them directly into messages. The process was straightforward, and the result felt more personal than sending plain text. It’s easy to see how this could change the tone of professional communication.

From a technical standpoint, it’s not the most advanced recorder I tested. The recording and editing features are fairly basic compared to other tools. However, its strength lies in integration with email and business platforms. It’s designed for speed and engagement rather than precision or polish. If you need high-quality production, it may feel limited. But for quick, human-focused communication, it offers something genuinely different.

Ratings

Pros:
Cons:
  • Not suited for high-end video production

Why I picked it: Riverside.fm delivers high-quality recordings by capturing video and audio locally. I liked how it feels closer to a professional studio than a typical screen recorder.

Finally, Riverside.fm gave me a much more professional and controlled recording experience. I tested it with a mock interview setup, capturing both video and screen content, and the quality difference was immediately noticeable. Its local recording feature ensures that audio and video are captured at high quality before being uploaded, which avoids common issues with online calls. This makes it particularly useful for podcasts, interviews, or collaborative projects. It feels closer to a studio environment than a typical screen recorder.

That said, it’s not the most casual tool to use. There’s a learning curve, and it depends heavily on a stable internet connection to function smoothly. It’s not something I would use for quick, spontaneous recordings. However, for more serious projects, the extra effort pays off in quality. The ability to record separate tracks also makes editing far more flexible. In the end, it feels like a tool built for professionals rather than everyday users.

Ratings

4.8/5

Pros:
  • Records high-quality audio/video locally for each participant

  • Separate tracks for easier editing

  • Very easy to use

Cons:

How to choose the best program to capture videos

After testing all these tools, I realised that picking the right screen recorder is less about rankings and more about matching the tool to the way you actually work. I found myself switching between tools depending on mood, task, and sometimes even patience level, which says a lot about how fragmented this space really is. If I needed full control, layered scenes, and something close to a production setup, I kept coming back to OBS Studio. It’s not the easiest option, but once you understand it, everything else starts to feel limited. On the other end of the spectrum, when I just needed to explain something quickly without thinking too much, Loom felt almost effortless, like sending a voice note but with visuals.

For something in between, tools like Movavi Screen Recorder or ScreenPal hit a comfortable middle ground. They don’t overwhelm you, but they still give enough control to produce something that looks intentional rather than improvised. If you’re recording gameplay or just want something built into your system, Xbox Game Bar does the job quietly in the background, without asking for much. And if your work leans toward interviews or podcasts, Riverside.fm feels like stepping into a different league altogether, where quality becomes the priority rather than convenience.

What surprised me most during testing is how much the “right” choice depends on how you think, not just what you need. Some tools reward planning and precision, others reward speed and spontaneity. I had moments where I opened OBS, stared at it for a second, and then closed it in favor of something simpler, just because I didn’t feel like configuring anything. That’s probably the most honest takeaway I can offer. Choose a tool that matches not only your task, but also your willingness to deal with complexity. In the end, the best screen recorder isn’t the one with the most features, it’s the one you’ll actually open when it matters.

Movavi Screen Recorder
The perfect way to record anything from your screen

Disclaimer: Please be aware that Movavi Screen Recorder does not allow capture of copy-protected video and audio streams.

Frequently asked questions

What is the best way to record clips on a PC?

When I started testing different ways to record clips on a PC, I realised the “best way” depends heavily on how much effort you’re willing to invest before pressing the record. If I wanted something quick and disposable, I’d reach for built-in tools like Xbox Game Bar, which lets me capture clips almost instantly without interrupting what I’m doing. It’s ideal for short gameplay moments or quick demonstrations, especially when speed matters more than polish. But the moment I needed something more controlled, with better audio balance or multiple inputs, I had to move beyond that simplicity.

That’s where tools like OBS Studio come into play, offering a level of control that feels closer to production than recording. I could define exactly what appears on screen, layer webcam footage, and manage audio sources independently. The trade-off is time, because setting everything up takes patience, but the results are noticeably better. In practice, I found myself choosing between speed and precision every time I recorded something. The best approach, at least for me, was knowing when to keep things simple and when to invest in a more structured setup.

How do I make a video on a PC?

Making a video on a PC turned out to be less about the software itself and more about the workflow behind it. I usually start by deciding what I want to show, whether it’s a tutorial, a walkthrough, or just a quick explanation. From there, I pick a tool that matches the task, something like Movavi Screen Recorder if I want a balance between ease of use and editing features. Recording is only the first step, though, and I quickly learned that planning even a rough structure saves time later.

Once the footage is captured, the process shifts into editing, trimming mistakes, adding text, and sometimes including voiceover. Some tools handle this internally, like ScreenPal, which lets me move from recording to editing without switching apps. That seamless transition makes a big difference, especially for longer videos. In the end, making a video on a PC is really about combining small steps into a smooth process. The tools help, but the clarity of what you’re trying to create matters just as much.

How can I record what I'm doing on my PC?

Recording what I’m doing on my PC sounds simple, but in practice it depends on how visible and controlled I want the result to be. For quick captures, especially when I don’t want to think about setup, I often use Loom. It records both my screen and webcam at the same time, which makes it perfect for explaining something to someone else. The fact that it generates a shareable link immediately also changes how I use it, it becomes more about communication than production.

If I need a more detailed or polished recording, I switch to something like FlashBack Recorder or OBS. These tools let me define exactly what part of the screen is captured and how audio is handled. I can include or exclude system sounds, adjust microphone levels, and even record longer sessions without interruptions. The key difference is control, because instead of just capturing activity, I’m shaping how that activity is presented. That shift makes recordings feel more intentional.

How can I record a video on my screen?

Recording a video on screen becomes surprisingly straightforward once you settle on the right tool for your needs. If I want something fast and browser-based, I’ll often use Screencapture.com or Screencastify. They let me start recording within seconds, which is useful when I don’t want to install software or configure settings. It’s a lightweight approach that works well for short clips or demonstrations.

For more involved recordings, especially when quality matters, I tend to rely on dedicated software like OBS or Movavi. These tools allow me to choose resolution, frame rate, and audio sources, which makes a noticeable difference in the final output. I also learned that small details, like checking microphone levels or closing unnecessary apps, can improve the result more than switching tools entirely. Recording the screen isn’t complicated, but doing it well requires a bit of awareness. Once you get used to that balance, the process becomes almost second nature.

Have questions?
If you can’t find the answer to your question, please feel free to contact our Support Team.
Join us for discounts, editing tips, and content ideas

1.5M+ users already subscribed to our newsletter

By signing up, I agree to receive marketing emails from Movavi and agree to Movavi's Privacy Policy.