

KineMaster vs. CapCut: Features, Pricing, Performance Compared

Edited by
Ben Jacklin
7,057

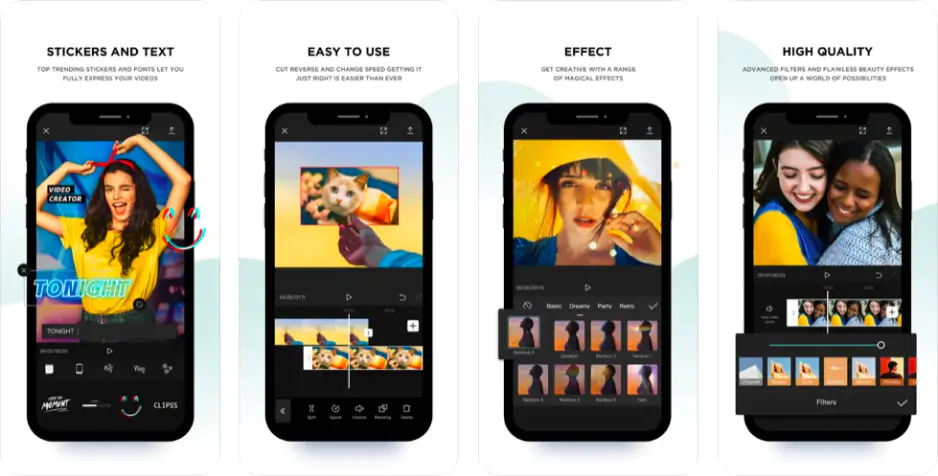
KineMaster and CapCut are two popular mobile video editors built for creators who edit on the go. CapCut leans toward fast, template-driven editing with free AI tools and social-ready presets, making it ideal for short-form content. KineMaster offers more manual control and precise multitrack editing, better suiting creators who want detailed, hands-on results.

Comparison parameter

KineMaster

CapCut

Who it's for

Mobile creators who want hands-on, layer-based control

Short-form and social creators who want speed and templates

Supported platforms

Android, iOS

iOS, Android, Windows, macOS

Ease of use

Manual timeline with more setup

Streamlined, template-driven workflow

Quick summary

Best for TikTok: CapCut has the edge here. Its trending templates, auto-captions, and one-tap effects are built around vertical short-form video, so a clip can go from raw footage to a polished, platform-ready export in minutes.

Best for beginners: CapCut feels friendlier for a first-time editor. Guided templates and automatic tools mean less manual setup, while KineMaster asks newcomers to arrange layers and adjust settings by hand before results start to click.

Best mobile workflow: KineMaster shines for pure phone editing. Its layer-based timeline gives precise manual control on a touchscreen, which suits creators who want to build detailed edits directly on a device rather than lean on presets.

Best free option: CapCut is more generous day to day, since most manual edits export without a watermark. KineMaster's free tier stays capable but stamps every export until you subscribe.

Ease of use

KineMaster

CapCut

Opening CapCut for the first time feels closer to picking up a phone camera than launching editing software. The app greets new users with ready-made templates, a clean import screen, and tools that surface only when needed, so the first edit rarely requires a tutorial. Adding text, trimming a clip, or dropping in a trending effect happens through obvious taps, which keeps the onboarding friction low even for someone who has never edited before.

KineMaster takes a more deliberate approach. Its interface centers on a circular control wheel and a layered timeline, giving editors direct access to keyframes, blending, and audio tracks, but that density asks for a little patience upfront. Once the layout becomes familiar, the manual controls feel fast and precise, though the initial learning stretch is steeper than CapCut's guided path.

Winner: CapCut, for smoother onboarding and an interface that stays approachable from the very first edit.

Features

The Kinemaster vs. CapCut feature comparison really comes down to two philosophies: automation versus manual craft. CapCut leans hard into ready-made content, offering a vast, constantly refreshed template library tuned to whatever is trending on TikTok. Drop in a few clips and the app handles beat-synced cuts, animated text, and matching transitions automatically. Its auto-captions are a standout, generating accurate subtitles in dozens of languages with word-level styling, plus a deep bank of effects and viral transitions that slot in with a single tap.

KineMaster approaches the same tasks from the editor's side of the table. Rather than templates, it hands you layered building blocks so the look is something you construct rather than select. Its auto-caption tool is newer and capable, though the effect and transition libraries lean more functional than trend-driven, favoring control over instant polish.

For vertical delivery, both export cleanly to 9:16 for Shorts, Reels, and TikTok, but CapCut adds platform-aware presets and direct sharing that shave steps off the upload.

Winner: CapCut, for a richer template, caption, and effect toolkit purpose-built for short-form platforms.

Performance

On export speed and stability, both CapCut and KineMaster run well on modern phones, but their limits show up differently. CapCut renders quickly and stays responsive across mobile and desktop, though heavier AI effects can lean on processing power and occasionally slow older devices. Its free tier exports clean 1080p, with 4K and the full AI toolkit reserved for paid plans, and watermarks appear only when a Pro-locked template or certain AI clip stays in the project.

KineMaster holds up impressively on mid-range hardware, keeping playback smooth even with several layers stacked on the timeline. Its trade-off is the watermark: every free export carries the KineMaster stamp until you subscribe, though the free tier still allows resolutions up to 4K. Being mobile-only, it also lacks the desktop fallback CapCut offers when a project outgrows a phone screen.

Winner: CapCut, for watermark-free free exports and the flexibility to move between mobile and desktop.

Pricing

KineMaster offers one Premium subscription that unlocks everything. It runs roughly $5 a month, with an annual plan that drops the effective cost considerably and typically pays for itself within a few months of regular editing. There are no confusing tiers to weigh – you are either on the free plan or the full Premium one, and the main reason most people upgrade is to shed the watermark and open the complete asset store.

CapCut splits its paid offering into two tiers, which makes the math a little busier. Standard sits around $9.99 a month and mainly removes template watermarks and widens the asset library, while Pro at about $19.99 a month (or $179.99 yearly) adds 4K export and the heavier AI generation tools. Its free plan is unusually generous, but the layered pricing means costs climb faster once you want the premium extras.

Winner: KineMaster, for cheaper, simpler all-in-one pricing without tier-hopping.

Platform compatibility

When it comes to platform reach, the CapCut vs. KineMaster matchup is fairly one-sided. KineMaster stays purely mobile, running on Android and iOS phones and tablets, which keeps it focused but ties every project to a small screen. CapCut works across iOS, Android, Windows, and macOS, so an edit started on a phone during a commute can be finished on a laptop later. That desktop-plus-mobile flexibility makes CapCut the more adaptable choice for creators who move between devices, while KineMaster suits those happy to edit entirely on the go.

AI tools

AI is where the gap between the two apps widens most. CapCut treats artificial intelligence as a core selling point, packing in auto-captions across dozens of languages, auto-cut that trims dead air and jump-cuts talking-head footage automatically, background removal without a green screen, and generative features like text-to-video and voice cloning that can build clips from a prompt. Many of these draw on a monthly AI credit pool, so heavy generative use has a ceiling, but the toolkit is unusually broad for a mobile editor.

KineMaster takes a lighter, more targeted approach, with practical assists such as Auto Captions and Background Removal that speed up routine work rather than generate content outright. The result is a clear split: CapCut leans into automation and creation, while KineMaster uses AI mainly to smooth manual editing.

Pros & cons

KineMaster

Pros:
  • Precise multi-layer timeline with hands-on manual control

  • Simple all-in-one pricing at a low monthly cost

  • Runs smoothly and stays stable on mid-range phones

  • Supports export up to 4K, even on the free tier

  • Keyframes, blending modes, and chroma key for detailed edits

Cons:
  • Watermark on every free export until you subscribe

  • Mobile-only, with no desktop version

  • Steeper initial learning curve

  • Fewer trend-driven templates and AI generation tools

CapCut

Pros:
  • Huge, constantly updated template library for short-form video

  • Broad AI toolkit, including auto-captions and text-to-video

  • Works across mobile and desktop

  • Most manual edits export watermark-free

  • Beginner-friendly, template-first workflow

Cons:
  • Layered Standard and Pro tiers raise costs quickly

  • Heavy AI use is capped by a monthly credit pool

  • Watermarks on some templates and AI clips

  • Advanced 4K export locked behind the Pro plan

Best use cases

Both apps handle everyday video, but the editing experience pulls each toward different jobs.

YouTube: CapCut suits fast uploads like vlogs and commentary, while KineMaster's layered timeline fits creators who want more manual control over longer, detailed cuts.

TikTok & social content: CapCut is the natural fit, with trending templates and quick vertical exports built for rapid posting. KineMaster works too, but asks for more hands-on assembly.

Beginner editing: CapCut lowers the barrier with guided templates, whereas KineMaster rewards those willing to learn its manual layout.

Professional editing: KineMaster's precise keyframing and blending suit creators chasing a specific, controlled look on mobile.

Business & casual editing: CapCut speeds through product demos, promos, and quick personal clips, while KineMaster fits casual editors who enjoy fine-tuning by hand.

Final verdict

In the end, the choice comes down to how you like to edit. CapCut is the better all-rounder for short-form creators: it is quick to learn, generous on its free tier, packed with AI and templates, and flexible enough to move between phone and desktop. KineMaster rewards a more hands-on approach, giving mobile editors precise layer-based control and simpler pricing in exchange for a steeper start and a mobile-only workflow. Pick CapCut for speed and social-ready polish; pick KineMaster when manual control matters most.

Alternative: Movavi Video Editor
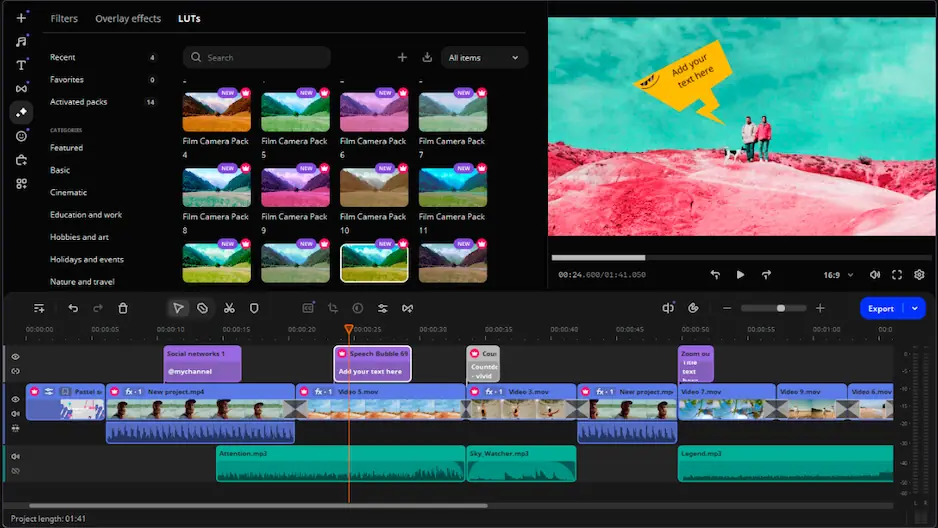
If neither app quite fits, Movavi Video Editor is worth a look, especially for creators who want to edit on a computer rather than a phone. The interface stays clean and approachable, drag-and-drop editing feels natural, and there is no long learning curve before a first project comes together. Running on both Windows and Mac computers, it also suits anyone who finds mobile-first editing too cramped for detailed work.

Movavi Video Editor bundles practical extras like transitions, filters, titles, AI-assisted features, and quick export presets. For users who edit regularly but do not need a full post-production suite, it offers more flexibility than a phone app while staying far easier to pick up than studio-grade software.


Frequently asked questions

Is CapCut better than KineMaster for beginners?

For most first-time editors, yes. CapCut's template-first design means you can assemble a finished video with minimal setup, letting automatic captions and trending presets do much of the heavy lifting. KineMaster is far from difficult, but its layer-based timeline expects a little more hands-on effort before edits start to feel natural. Beginners who want quick results usually settle into CapCut faster, while those curious about manual control may appreciate KineMaster's deeper toolkit over time.

Can KineMaster export videos without a watermark?

Only with a subscription. Every export from the free tier carries the KineMaster stamp, and the sole official way to remove it is upgrading to Premium. That upgrade also opens the full asset store. CapCut handles this differently, leaving most manual edits watermark-free even without paying, though certain templates and AI-generated clips can still add branding.

Which app is cheaper overall?

KineMaster generally costs less. Its single Premium plan runs around $5 a month, with an annual option that lowers the effective price further. CapCut's paid structure splits into Standard and Pro tiers, so costs climb once you want 4K export or the heavier AI tools. That said, CapCut's unusually capable free plan means many creators never pay at all, which can make it the cheaper choice in practice.

Have questions?
If you can’t find the answer to your question, please feel free to contact our Support Team.
Join us for discounts, editing tips, and content ideas

1.5M+ users already subscribed to our newsletter

By signing up, I agree to receive marketing emails from Movavi and agree to Movavi's Privacy Policy.